I've spent fifteen years watching people transition from nervous floor plan dreamers to exhausted, proud owner-builders. Most of them start the same way. They buy a block of land in a spot like the Sunshine Coast hinterland or a quiet street in Dubbo, and they realize the local builders are booked out until 2027. That is when the kit home idea starts looking like a Very Good Plan. But let's be straight with each other. It is not just a giant Lego set. It is a serious construction project that requires a bit of grit, some decent tools, and the ability to read a technical drawing without throwing it across the shed.
The Groundwork Stage
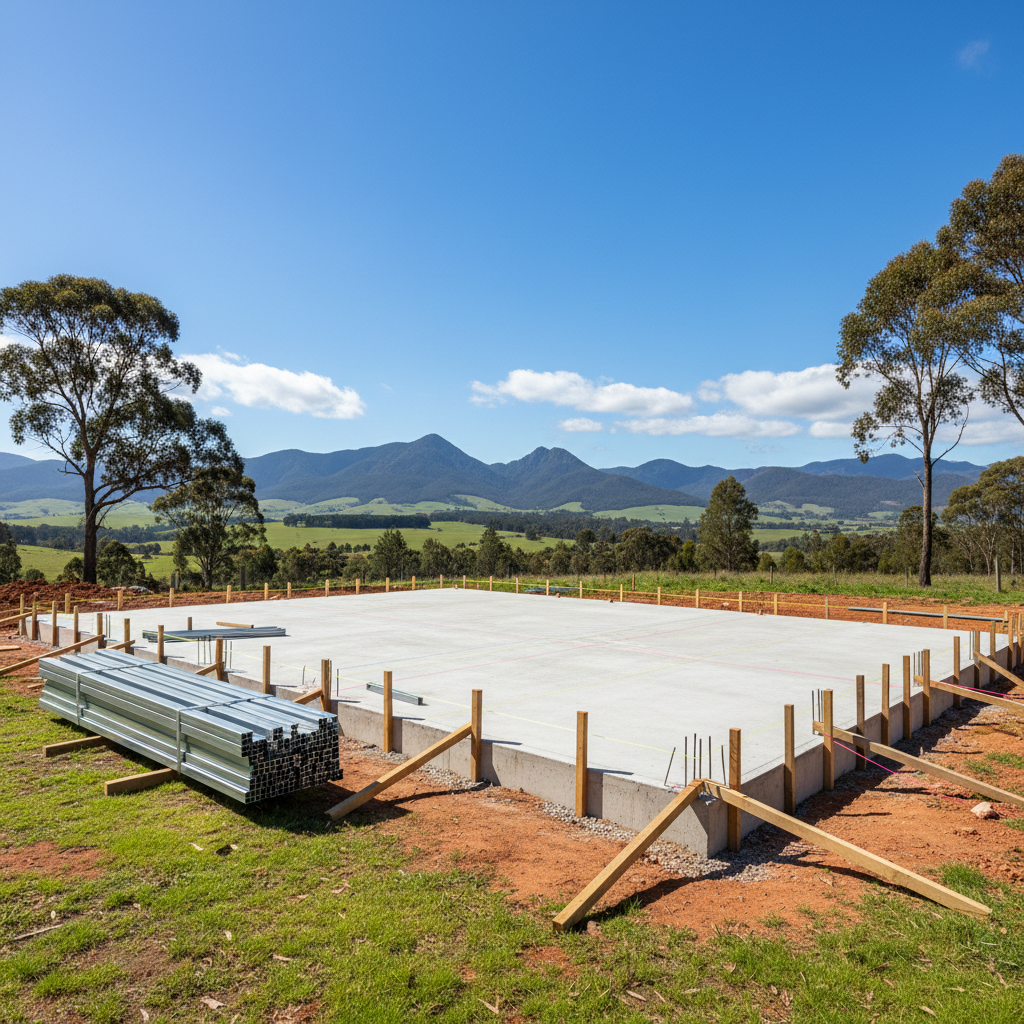
Everything starts with the slab or the piers. If your foundation is out by 20mm, you are going to be fighting every single wall frame for the rest of the build. Because steel doesn't stretch. It is precise engineering. I always tell blokes that if they are doing their own site prep, they need to spend double the time they think they need on the string lines. Most kit homes in Australia today go down on a concrete slab, usually a waffle pod or a standard raft slab depending on your soil report. You’ll be looking at your H1 or M class soil classification, and that tells the engineer exactly how much steel bar needs to go into that pour. Don't skip the termite protection either. Even with a steel frame, those little blighters will eat your skirting boards and kitchen cabinets if you give them half a chance. We use termimesh or similar physical barriers around the penetrations. It's cheap insurance. Plus, your local council will knock you back at inspection if it's not done right.
Unloading the Truck Without Losing Your Mind
The day the semi-trailer rolls up is the best and worst day of the project. You’ll have a pile of TRUECORE steel frames, stacks of Colorbond roofing, and crates of windows dropped on your site. Don't just let the driver dump it in a heap. You want the wall frames stacked near where they go, but shielded from the worst of the weather. And for heaven’s sake, keep them off the direct dirt. Use some scrap timber dunnage to keep the bottom of the packs dry. I saw a guy in Gippsland once who let his frames sit in the mud for three weeks during a winter soak, and trying to clean those tracks before standing them was a nightmare he didn't need. Check your inventory list immediately. Screws, brackets, flashing, it all needs to be accounted for. If you're missing a box of wafer head screws, you want to know about it on day one, not at 4pm on a Saturday when the shops are shut.
Standing the Walls
This is where the shape of your house finally appears. It's a great feeling. You start with the corners. Steel frames are lighter than timber - heaps lighter - so two people can usually manhandle a standard wall section without needing a crane. You'll use your battery drill and hex head screws to join the panels at the corners. But here is the trick: don't tighten everything 100% until you've checked for plumb. Use a long level, or better yet, a laser. Because a steel frame is so rigid, you have to be spot on. We use temporary bracing - usually just some long timber or steel strapping - to hold the walls exactly vertical while we work our way around the perimeter. Once the external walls are up and locked, you move to the internals. It starts to feel like a real house then. You can walk through the doorway and see where your morning coffee spot will be. It's a big milestone. Just remember to leave the internal door openings clear of bottom plates if you are using a slab, or you'll be tripping over them until the floor finishes go in.
The Roof Structure and the Weather-Thight Race
Once the walls are braced and tied down to the slab with your chemsets or expansion bolts, you start on the trusses. This is where it gets a bit more technical. Depending on the span, those trusses can be beefy. You're following the layout plan provided with the kit, and you've got to ensure the spacing is exactly what the engineering says. Usually 600mm or 900mm centers. If you're in a high wind zone, say up near Townsville or even on a ridge in the Blue Mountains, your tie-down requirements are much stricter. You'll be using more screws and heavier brackets. Don't skimp. Following AS 1684 for residential timber-framed construction is the standard for timber, but for us, we're looking at the steel equivalents and ensure everything matches the engineering cert provided. Once those trusses are up and the roof battens are on, you want that Colorbond cladding on fast. Getting the roof on means your frames stay dry and you can start on the windows. People think windows are hard, but they're mostly just fiddly. Make sure your reveals match your internal wall thickness (usually 70mm or 90mm frames plus your plasterboard). Use heaps of flashing tape. Water is the enemy of any building, and most leaks happen around poorly flashed windows. I reckon 90% of a kit build's success comes down to how much you care about the flashing details.
The Difference Between a Kit and Other Methods
It’s important to understand what you’re actually doing here. You aren't just buying a box and moving in. You are the project manager. You’re hiring the plumber to rough-in the pipes through the slab before it's poured. You're getting the sparky in once the frames are up but before the insulation goes in. This isn't like those transportable buildings where the whole thing arrives on a trailer with the curtains already hung. Those are fine for some, but they don't give you the same flexibility or the same sense of accomplishment. Plus, when you build a kit home, you know exactly what’s behind the walls. You know the insulation is tucked in tight. You know the electrical cables aren't being pinched. It gives you a level of control you just don't get elsewhere. And because you’re using BlueScope steel, you aren't worried about the house sagging or warping as the timber dries out. It’s straight. It stays straight. That makes your tiler and your cabinet maker very happy later on when they find out the walls are actually square.
Advice for the Owner-Builder
If you're going down the owner-builder path, get your white card first. It's a legal requirement and teachs you some basic safety stuff that might save your skin. Also, talk to your local council early. Every LGA in Australia has its own quirks. Some are fine with kit homes, others want an extra engineering report for the soil type. And don't be afraid to pull in a pro for the bits you're not sure about. I've seen plenty of DIYers do the frames and the cladding themselves, then hire a pro roofer to do the ridge capping because they didn't fancy crawling around 4 meters in the air. There is no shame in that. In fact, it's smart. The assembly process is a marathon, not a sprint. Take your time with the weatherproofing and the structural connections. The fit-out - the kitchens, the paint, the skirting - that's the fun stuff. But the kit assembly? That is the skeleton of your home. Get the skeleton right, and the rest is easy.
I usually tell people to give themselves at least six to nine months for a full build if they're doing it on weekends. It's a lot of work. But seeing a pile of steel turn into a weatherproof shell by your own hands? There's nothing like it.


