Demystifying the Kit Home Assembly Journey
There is a unique sense of satisfaction that comes from looking at a finished home and knowing you played a central role in its creation. In the Australian housing landscape, kit homes have emerged as a sophisticated solution for those who want to be hands-on without reinventing the wheel. Unlike traditional builds where every piece of timber is measured and cut on-site, a kit home arrives as a high-tech puzzle ready for assembly.
From the rugged coastlines of Western Australia to the rolling hills of the Byron Bay hinterland, owner-builders are turning to these systems to gain more control over their quality of finish and project timeline. But how exactly does a pile of steel frames and palletized components transform into a structural masterpiece? In this guide, we dive deep into the technical assembly process, providing a roadmap for every stage of your build.
Stage 1: Site Preparation and Foundation
Before a single piece of steel arrives on your property, the groundwork must be flawless. The assembly process actually begins with site benching and soil testing. In Australia, your slab design will depend heavily on your soil classification (ranging from Class A to Class P). Most modern kit homes are engineered to sit on either a reinforced concrete slab or a raised floor system using steel piers.
Technical Tip: If you are opting for a concrete slab, ensure your plumber has accurately positioned all 'waste points' or 'rough-ins' before the pour. Because kit home frames are precision-engineered to millimetre accuracy, there is very little room for error if a toilet waste pipe is ten centimetres out of place.
Stage 2: Receiving and Inventory Management
When the delivery truck arrives, it is time for the logistics phase. A comprehensive kit includes the TRUECORE steel frames, roofing, cladding, windows, doors, and insulation. The secret to a smooth assembly is organization. Do not simply pile everything in one corner of the site. Group your components by their assembly sequence. Keep your wall frames close to the slab, and ensure your roofing iron and external cladding are stored flat and protected from high winds and moisture.
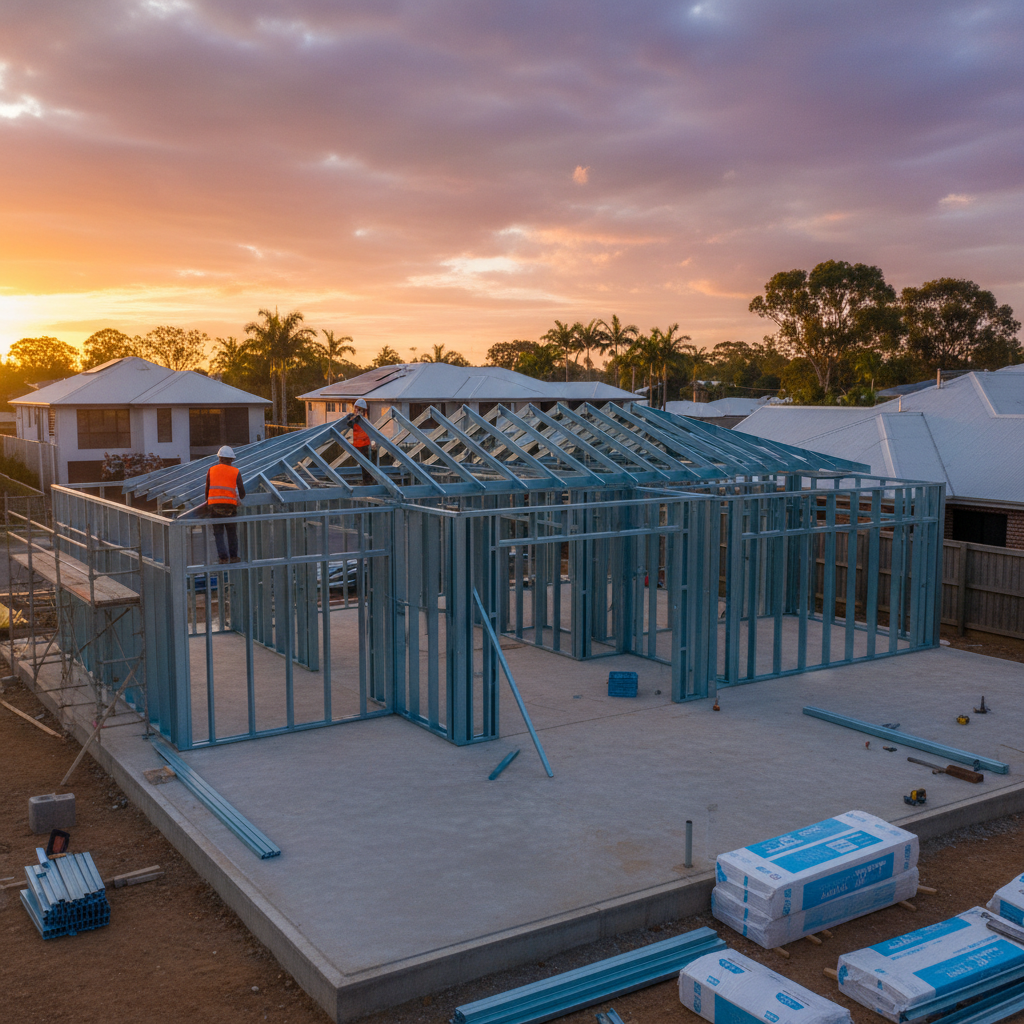
Stage 3: Standing the Frames
This is where the home truly takes shape. One of the primary benefits of using Australian steel frames is their weight-to-strength ratio. Steel frames are significantly lighter than traditional timber, making them much easier to manhandle into position without heavy machinery.
The assembly usually begins at a corner. Following the provided layout plan, each wall section is bolted to the slab or sub-floor. Verticality is key here. Every owner-builder should have a high-quality spirit level or a laser level on hand. Once the external walls are braced and squared, the internal partition walls are moved into place. Because these frames are manufactured using computer-aided design, they arrive pre-punched with service holes for electrical wiring and plumbing, saving you hours of drilling later.
Stage 4: Roof Trusses and Structural Integrity
With the walls standing, the project moves skyward. Installing the roof trusses is a critical structural step. In many kit designs, these trusses are also made from steel, ensuring they won't warp or twist over time. This phase requires careful attention to the bracing schedule. Australian standards for wind loading are strict, especially in cyclone-prone or high-wind regions. Ensuring every bracket, screw, and tie-down is installed exactly as per the engineering drawings is what gives a kit home its legendary durability.
Stage 5: Creating the Building Envelope (The 'Shell')
Now that the skeleton is complete, it is time to wrap the building. This stage is crucial for the long-term thermal performance of your home. A high-quality moisture barrier or building wrap is applied to the exterior of the frames. This is followed by the installation of windows and external doors.
Technical Tip: Pay close attention to the flashing around windows. In the Australian climate, preventing water ingress is paramount. Proper flashing ensures that even during a horizontal summer downpour, your steel frames and internal cavity remain bone dry.
Stage 6: Roofing and External Cladding
With the windows in, you are ready to install the roof sheeting and external cladding. This is often the most rewarding stage for owner-builders because the project starts to look like a finished house. Whether you have chosen traditional corrugated iron or more modern architectural cladding, the process involves fixing the material to the horizontal battens already attached to your steel frames. Steel's straightness proves its worth here, as you won't have to 'shim' or pack out walls to get a perfectly flat finish on your cladding.
The Role of the Owner-Builder
While the kit provides the physical components of the 'shell', the owner-builder acts as the project manager. Your role involves coordinating the specialized trades that the kit provider does not supply. This includes:
- Licensed Electricians: To run wiring through the pre-punched holes in the steel frames.
- Licensed Plumbers: To connect internal lines to the site services.
- Gyprockers and Plasterers: To finish the internal walls.
- Cabinet Makers: For kitchen and bathroom fit-outs.
Practical Tip for Owner-Builders: Engage your trades early. Show them the technical specifications of your kit home so they understand they will be working with steel frames rather than timber. Most modern tradespeople prefer steel because it is straight and predictable, but early communication ensures they bring the right fasteners and tools for the job.
Why Steel Frames Make the Process Click
Throughout the assembly process, the material choice plays a massive role in the ease of construction. Using BlueScope TRUECORE steel provides several technical advantages for the DIY-minded builder. Firstly, steel is dimensionally stable. It does not shrink, swell, or twist with changes in humidity. This means that once you set your walls plumb, they stay plumb. For an owner-builder, this precision reduces the 'fix-it' work that often plagues traditional construction. Furthermore, steel is naturally termite-proof, providing long-term peace of mind without the need for intensive chemical treatments within the frame itself.
Design and Lifestyle Integration
The assembly process isn't just about bolts and beams, it is about realizing a vision. Modern Australian kit homes are designed with the local lifestyle in mind, featuring open-plan living areas, large window spans to capture breezes, and seamless indoor-outdoor transitions. Because the steel frames are engineered for strength, they allow for wider spans without the need for bulky support pillars, giving you more freedom in your interior design.
Conclusion: From Kit to Home
The journey of assembling a kit home is one of the most empowering experiences a property owner can have. By following a structured assembly process, starting with a solid foundation and moving through the framing and lock-up stages, you can ensure a professional-quality result. While the technical aspects require diligence and a commitment to following engineering plans, the reward is a precision-built, durable home that is perfectly suited to the Australian environment.
Whether you are building a weekend getaway in the bush or a primary residence in the suburbs, understanding the 'how' behind the assembly is your first step toward success. Take your time, prioritize safety, and enjoy the process of bringing your new home to life, one bolt at a time.


